34
Over on Ebay Underground, the members are all about helping to educate each other. I wrote up this quick tutorial about using Picasa to edit your product photos and it was presented as a class in the board's chat room. Here it is in case it can help someone!
Welcome to Picasa!
I think you may find that Picasa has less options than other programs, so it's good if you just need some basic fixes to your photos and don't want to get too fancy!
First of all, you'll want to import your picture(s) into Picasa, from your camera, your memory card, etc..
Click the Import button in the upper left. It will take you to the Import tab.
Once you're on the Import page, make sure the Import From box has the right source. In this case I use my memory card and these are the only pictures on the card. I double check that at the bottom I have a Folder selected to send them to, and then I click "Import All" from the lower right.
(If you only want 1 picture or a few pictures imported, just select them from the ones showing and click "Import Selected")
Once importing is done, it will pop you back to the Library tab, where your most recent imports will be right on top.
I decide which photo to work on and double click it. I'm choosing the L'amour girls shoes.
This brings me to the edit page. There are lots of things you can do here...feel free to play around. I usually stick with the basics. The three I use the most are:
I'm Feeling Lucky
Straighten
Crop
I'm Feeling Lucky is your basic picture fix. It will lighten dark pictures, etc... If you don't like the results, you can always undo and play around with some of the other buttons...like 'Fill Light' 'Auto Contrast', etc...
In this case, I'm Feeling Lucky didn't really help my photo, so I'm not showing a screenshot. I'll just move on to Straighten.
Click Straighten and you'll see this grid over your picture.
Use the slider under the picture until you are happy with the result and then click 'Apply'.
Then I go to Crop. Click Crop and it will default to Manual with three choices underneath. I usually pick the far right one and go from there.
Once I click the far right one, a light colored box will appear over your picture.
You can adjust the sides of the box until it's where you want it to be. Click Apply.
Once you're done with the photo, you can go back to the Library page.
Make sure the correct photo is chosen, or highlighted, then click Export at the bottom of the page.
A new box will pop up.
Here you can add a watermark and resize (i set mine to 1000).
Make sure you note where the resized photo will be sent. Picasa sends them to a Picasa folder and an Exports subfolder. I usually just work out of there...I know all the pictures in my Exports folder are resized.
NOTE: Changes made in Picasa will not affect photos on your computer unless you hit 'Save' at the top of each day on the main Library page. So you can crop, resize, make it black and white...but it just stays in Picasa unless you save it. Of course photos that are exported will have all those changes. NOTE 2: Any changes you've made to a photo in Picasa (if you haven't saved it) can be undone by reclicking on the photo, getting to the edit page and clicking UNDO on all features.
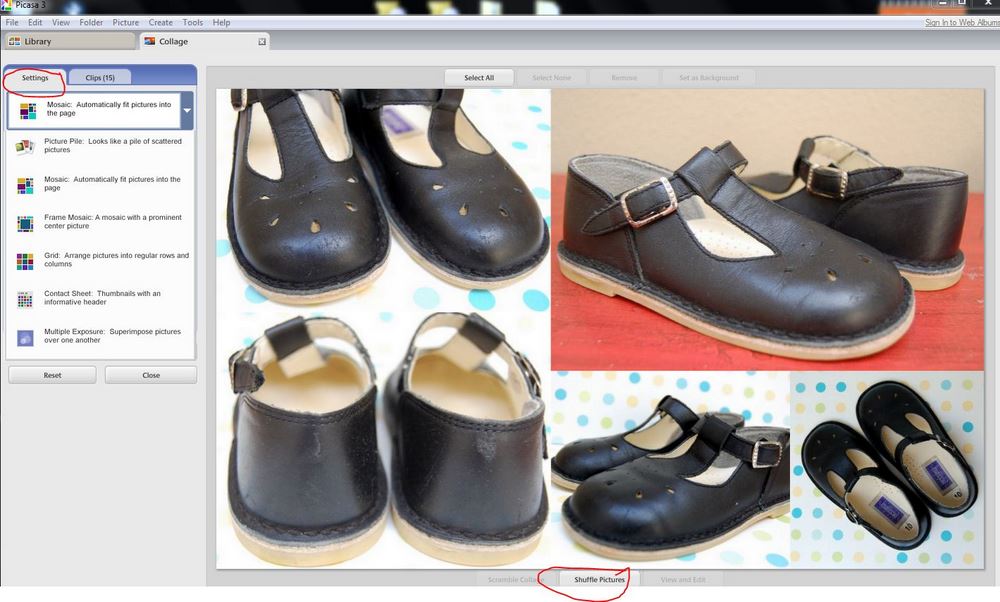
Ok...so now a quick Collage lesson.
I've fastforwarded...and I finished editing all my pictures for these shoes. I'm in the Library and I click all the pictures I want to include (CTRL+click)
You'll see the pictures you want in the lower left 'deck'. Then click "Collage" on the bottom right-ish.
The collage page will open and you'll be able to choose from a variety of collage types.
You can also hit shuffle at the bottom to rearrange the photos to a better order.
I rearranged mine and added a border or space between each photo.
When you're ready, click Create Collage.
Picasa will put them in a separate folder at the top. This is where all your collages will be. From there you can resize and export.
(I did forget a picture of the soles of these shoes..so if I wanted to use this in my listing, I would still have to add that...either re-do the collage or add another photo. Haven't decided yet. :) )
So those are the basics! If you want to get fancy, there is always Picnik. You may have noticed that button on the Edit page. You can open a photo there...add borders, text, etc...and resave back to Picasa.
Have fun and happy listing!!